
As the weather begins to cool and the leaves start to change color, thoughts turn to apple picking. For many, this is an annual tradition that signals the beginning of fall. If you’re lucky enough to have your own apple tree or know someone who does, you may find yourself with more apples than you know what to do with.
While fresh apples are always a treat, there are only so many pies and crisps you can make. Preserving apples in jars is a great way to extend the season and enjoy their flavor long after the trees have been picked clean.
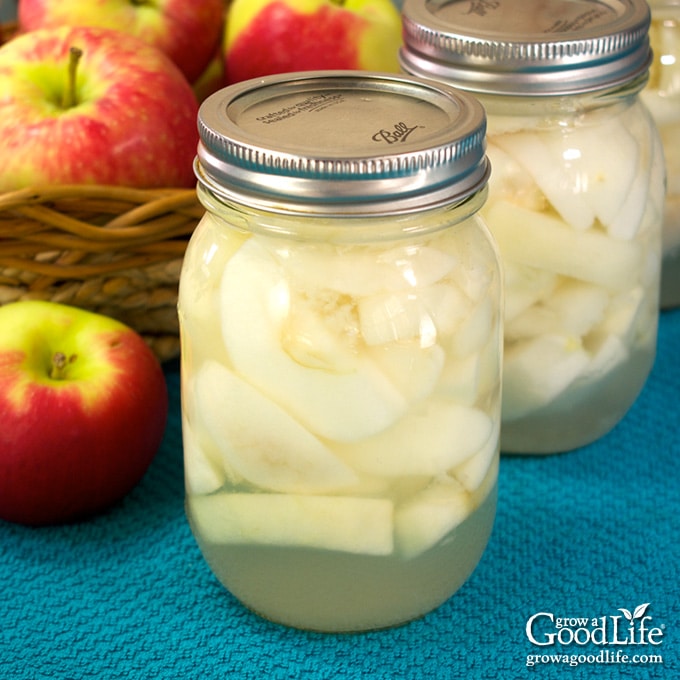
There are several methods for preserving apples in jars, but the most common is simply packing them in sugar syrup.
This method not only keeps the apples from browning, but also adds a bit of sweetness that can be enjoyed throughout the winter months. To preserve your apples using this method, start by sterilizing your jars and lids. You can do this by boiling them in water for 10 minutes or running them through your dishwasher on the hottest setting.
Once your jars are clean and dry, begin peeling and slicing your apples into thin wedges.
- Gather your supplies
- You will need apples, jars, lids, rings, a large pot, water, and a canning funnel
- Wash your apples in cool water to remove any dirt or debris
- Cut the apples into slices or chunks, depending on your preference
- Place the apple slices or chunks into the jars
- Be sure to leave 1/2 inch of headspace at the top of each jar
- Pour boiling water over the apples in each jar, filling it to within 1/2 inch of the top of the jar
- Use a canning funnel to add sugar syrup to each jar (optional)
- To make sugar syrup, mix 2 parts sugar to 1 part water and boil until dissolved
- Remove any air bubbles by running a non-metallic spatula around the inside edge of each jar before sealing with a lid and ring finger-tighten just until snug (do not over tighten)
- 8 9Place filled jars on racks in canner; lower into water using handles; ensure that jars are covered by at least 2 inches of boiling water; cover pan with lid and start timing when boiling resumes: process for 20 minutes if using pint size jars or 25 minutes if using quart size jars (adjust time according to altitude as necessary)
- If you live above 1,000 feet above sea level see this page for how processing times change with altitude
- 10After specified processing time has elapsed turn off heat removing canner lid away from you so steam does not burn your face; wait 5 minutes before removing jars from canner allowing them to cool slightly before handling
- ; place processed jars upright onto towel(s)to prevent them from rusting shut while they finish cooling overnight undisturbed; do not retighten screw bands
Canning apples – The easy way for filling your pantry
What is the Best Way to Preserve Apples?
Apples are a great fruit to have on hand because they last longer than many other fruits. But even apples can go bad if they’re not stored properly. Here are some tips for preserving apples so they’ll stay fresh longer.
One way to preserve apples is to store them in the fridge. Apples will last about a week stored in the crisper drawer of your refrigerator. If you want them to last even longer, you can store them in the freezer.
Apples will keep for several months when stored in the freezer, but they won’t taste as good as fresh apples. Another way to preserve apples is to dried them. Drying apples is easy and it’s a great way to have a healthy snack on hand that will last for months.
To dry apples, simply slice them thinly and lay them out on a dehydrator tray or an oven set at its lowest temperature with the door propped open slightly. Dry until crisp (this can take anywhere from 4-12 hours depending on how thin you’ve sliced the apple slices and how hot your oven or dehydrator gets). Store dried apple slices in an airtight container and enjoy as a healthy snack throughout the fall and winter months!
Can You Keep Apples in a Jar?
You can keep apples in a jar, but there are a few things to keep in mind. Apples will release ethylene gas as they ripen, so if you put them in a sealed jar, the ethylene will build up and cause the apples to overripen. To prevent this, poke a few holes in the lid of the jar or wrap the apples loosely in paper before putting them in the jar.
Another thing to keep in mind is that apples need ventilation to prevent mold growth, so don’t pack them too tightly into the jar.
How Do You Keep Apples Crisp When Canning?
If you are canning apples, you want to make sure that they stay crisp. There are a few things that you can do to help keep them crisp.
First, when you are selecting apples for canning, make sure that they are ripe but still firm.
If they are too ripe, they will turn to mush when canned. If they are not ripe enough, they will be hard and won’t have the same flavor.
Once you have selected your apples, wash them thoroughly.
You don’t want any dirt or chemicals on the skin of the apple as this can affect the taste and texture of the finished product.
After washing, cut the apples into even pieces. It doesn’t matter what size you cut them into as long as they are all roughly the same size so that they cook evenly.
Now it’s time to start prepping your jars for canning. sterilize them by boiling them in water for at least 10 minutes. Once sterilized, let them dry completely before adding anything to them.
To begin filling your jars with apples, start by adding 1/2 cup of sugar and 1/4 cup of lemon juice to each jar (this is for a batch of 4 quarts). Then add in the apple slices, packing them tightly into the jar but being careful not to break or crush them. Leave about 1 inch of headspace at the top of each jar before sealing with a lid and screwing on a ring finger-tight.
*
process in a hot water bath canner according to these instructions: For altitudes below 1,000 feet (304 m), use boiling water bath processing times; process pints for 20 minutes and quarts for 25 minutes.*For altitudes above 1 ,000 feet (304 m), increase processing time by 5 minutes per pint or 10 minutes per quart.
Can You Raw Pack Apples for Canning?
Yes, you can raw pack apples for canning. This simply means that you will pack the apples into the jars without pre-cooking them. Raw packed apples will retain their shape and texture better than if they were cooked first, but they will take longer to process in a water bath canner.
If you choose to raw pack your apples, you will need to use a firmer variety such as Granny Smith, Honeycrisp, or Braeburn. Cut the apples into uniform pieces – slices or chunks – and add them to the jars, packing them tightly. You will want to leave about 1 inch of headspace at the top of the jar.
Before adding the lids and rings, pour hot syrup over the apples (you can make your own by boiling sugar and water in a ratio of 3:1) or apple juice up to the level of the fruit. Wipe the rims clean and process in a boiling water bath canner for 20 minutes for half-pint or pint jars, 25 minutes for quarts.
Credit: growagoodlife.com
Preserving Stewed Apples in Jars
Stewed apples are a delicious and healthy treat that can be enjoyed all year round. And what better way to enjoy them than by preserving them in jars? This way, you can have your very own homemade stewed apples whenever you want!
Here’s how to do it:
1. Start with fresh, firm apples. Wash them thoroughly and cut them into chunks.
There’s no need to peel or core the apples – just chop them up into bite-sized pieces.
2. Place the apple chunks into a large pot or Dutch oven along with some water, sugar, cinnamon, and nutmeg (optional). Stir everything together and bring it to a boil over medium-high heat.
3. Once the mixture is boiling, reduce the heat to low and let it simmer for about 15 minutes, stirring occasionally. The apples should be soft and cooked through but still retain their shape.
4. Ladle the stewed apples into clean jars, leaving about ½ inch of headspace at the top of each jar.
Wipe the rims of the jars clean and screw on lids tightly.
5. Process the jars in a boiling water canner for 10 minutes (start timing when the water comes back to a boil).
Conclusion
There are several ways to preserve apples in jars, and the method you choose will depend on what you plan to use the apples for. If you want to keep them for eating fresh, then you will need to use a different method than if you plan to use them for cooking or baking.
The most important thing to remember when preserving apples is to start with fresh, ripe fruit.
Apples that are past their prime will not taste as good preserved and may not last as long. Once you have your apples, wash them thoroughly and remove any blemishes.
If you plan to eat the apples fresh, then slice them thinly and pack them into jars with a sugar syrup.
This will help keep them from browning and maintain their flavor. For longer storage, consider canning the apples in jars using a hot water bath method. This will require some additional equipment but will allow you to store the apples for much longer periods of time.
Cooking or baking apples can be preserved by freezing them whole or in slices. When thawed, they may not be quite as crisp as fresh apples but they will still retain their flavor and be perfect for pies or other cooked dishes.